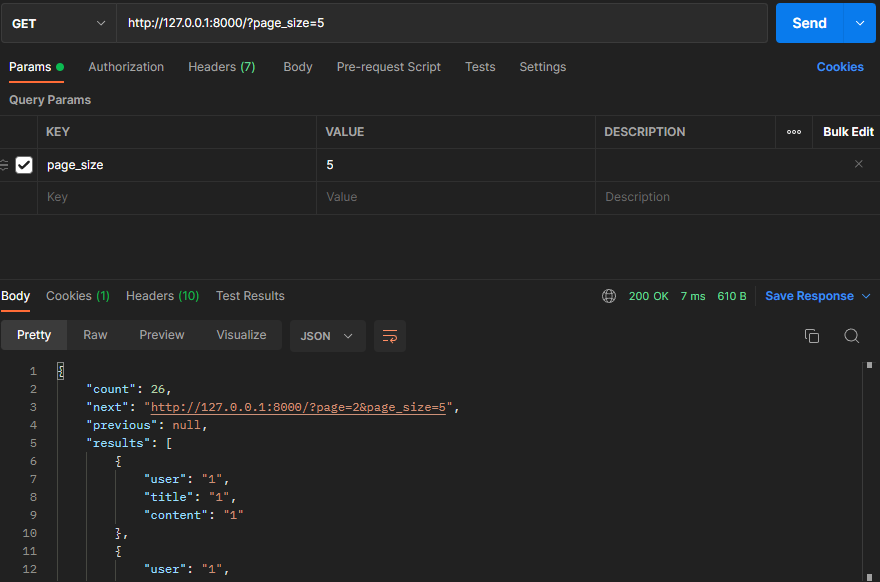
APIView 를 상속받아 구현하는 CBV 클래스의 경우는 settings.py에서 pagination 설정을 적용해도 작동되지않는다.
이를 구현하기 위해선 별도의 pagination을 적용해줘야만 한다.
pagination.py 를 새로 만들어서 아래의 클래스들을 정의해줘야한다!
# article/pagination.py
from rest_framework.pagination import PageNumberPagination

class BasePagination(PageNumberPagination):
    # 페이지 사이즈를 지정할 query_param 문자열 지정 ex) /?page_size=5
    page_size_query_param = 'page_size'

class PaginationHandlerMixin(object):
    @property
    def paginator(self):
        # 페이지네이터와 연결된 뷰 확인 hasattr(속성 포함 여부 확인)
        if not hasattr(self, '_paginator'):
            if self.pagination_class is None:
                self._paginator = None
            else:
                self._paginator = self.pagination_class()
        else:
            pass
        return self._paginator

    def paginate_queryset(self, queryset):
        # 결과 한 페이지를 반환하거나, 페이지 분할을 사용하지 않을 경우 '없음'을 반환합니다.
        if self.paginator is None:
            return None
        return self.paginator.paginate_queryset(queryset, self.request, view=self)

    def get_paginated_response(self, data):
        # 지정된 출력 데이터에 대해 페이지 유형 'Response' 개체를 반환합니다.
        assert self.paginator is not None
        return self.paginator.get_paginated_response(data)
# article/views.py
from rest_framework.views import APIView
from rest_framework.response import Response
from rest_framework import status

from .models import Article as ArticleModel
from .serializers import ArticleSerializer

# 페이지네이션 관련 class import
from .pagination import PaginationHandlerMixin, BasePagination

# pagination이 필요한 APIView 클래스들에게 PaginationHandlerMixin을 인자로 주면된다
class PaginationTest(APIView, PaginationHandlerMixin):
    pagination_class = BasePagination # query_param 설정 /?page_size=<int>
    serializer_class = ArticleSerializer

    def get(self, request):
        instance = ArticleModel.objects.all()
        page = self.paginate_queryset(instance) # page_size, page에 따른 pagination 처리된 결과값
        # 페이징 처리가 된 결과가 반환되었을 경우
        if page is not None:
            # 페이징 처리된 결과를 serializer에 담아서 결과 값 가공
            serializer = self.get_paginated_response(self.serializer_class(page, many=True).data)
        # 페이징 처리 필요 없는 경우
        else:
            serializer = self.serializer_class(instance, many=True)
        return Response(serializer.data, status=status.HTTP_200_OK)
이제 프론트단에 한번 해당 데이터를 이용해서 뿌려보기로 했다.
프론트랑 연결해야하기 때문에 CORS 설정부터 해준뒤..
$pip install django-cors-headers

INSTALLED_APPS = [
	...
    'corsheaders',
]


MIDDLEWARE = [
    "corsheaders.middleware.CorsMiddleware",
    ...
]

# FE의 주소값을 입력해주어야한다.
CORS_ALLOWED_ORIGINS = [
    "http://localhost:5500",
    "http://127.0.0.1:5500",
]
간단하게 index.html에 다 자바스크립트도 작성
<!DOCTYPE html>
<html lang="en">
<head>
    <meta charset="UTF-8">
    <meta http-equiv="X-UA-Compatible" content="IE=edge">
    <meta name="viewport" content="width=device-width, initial-scale=1.0">
    <title>Document</title>
</head>
<script>
    async function get_pagination_list(url){
        // url 판별, 이전, 다음 버튼 눌렀을 때 해당하는 url 받아오고 최초접속, 1페이지 인 경우 null
        if (url == null){
            url = "http://127.0.0.1:8000/?page_size=5"
        };
        const response = await fetch(url,{
            method: "GET",
            'content-type': "application/json",
        })

        response_json = await response.json()

        // 게시물 뿌리는 div 선택
        const list_box = document.querySelector(".list_box");
        list_box.innerHTML = '' // 기존내용 초기화

        // forEach문 돌려서 게시물 결과들 출력
        response_json['results'].forEach(data => {
            // append를 이용하기 위해서 div 생성
            const article = document.createElement('div')
            // class 명 지정
            article.className = 'item-mygallery';
            // innerHTML로 원하는 형태로 데이터 출력
            article.innerHTML = `
            <div class="box-text-data">
                <p>유저 : ${data.user}</p>
                <p>제목 : ${data.title}</p>
                <p>내용 : ${data.content}</p>
                <hr>
            </div>`
            list_box.append(article)
        })

        // 이전버튼 생성할 div 선택
        const previous_div = document.querySelector(".previous")
        previous_div.innerHTML ='' // div 내부 초기화
        // 다음버튼 생성할 div 선택
        const next_div = document.querySelector(".next")
        next_div.innerHTML ='' // div 내부 초기화
        // 이전 버튼 생성
        if (response_json['previous'] != null){
            const previous_btn = document.createElement('span')
            previous_btn.classNAme = 'previous_btn';
            previous_btn.innerHTML= `
            <button type="button" onclick='get_pagination_list("${response_json['previous']}")'>이전</button>`;
            previous_div.append(previous_btn)
        }
        // 다음 버튼 생성
        if (response_json['next'] != null){
            const next_btn = document.createElement('span')
            next_btn.classNAme = 'next_btn';
            next_btn.innerHTML= `
            <button type="button" onclick='get_pagination_list("${response_json['next']}")'>다음</button>`;
            next_div.append(next_btn)
        }


    }
    get_pagination_list()

</script>
<body>
    <h1>페이지네이션 테스트</h1>
    <div class="list_box">

    </div>

    <div class="previous"></div>
    <div class="next"></div>
</body>
</html>
'회고록(TIL&WIL)' 카테고리의 다른 글
| TIL 2022.07.18 Toast UI editor Javascript 구현 (0) | 2022.07.18 |
|---|---|
| TIL 2022.07.18 AWS S3파일 업로드, IAM 생성 (0) | 2022.07.18 |
| TIL 2022.07.13 SidePro - S.A, 모델링 (0) | 2022.07.13 |
| TIL 2022.07.12 DRF TestCode2, DRF 라이브코딩 소스코드 (0) | 2022.07.13 |
| TIL 2022.07.11 DRF TestCode (0) | 2022.07.11 |

