EL 표현식
<%= %> 과 동일하게 ${} 의 안에 작성하는 방식
실수 연산을 하기 때문에 연산을 피하는 것이 좋다.
문자와 문자열을 구분 하지 않는다. 문자열만 존재.
객체 표현 시<%=%>은 null 불가, EL은 null은 가능하나 new 불가능
null 이면 아예 아무것도 안나오기 때문에 오류도 안떠서 null에 대한 제어문을 줄일 수 있다.


EL은 page scope에 실려있는 변수를 호출한다. (scope의 default는 page)
<%
DeptVO bean1 = new DeptVO();
pageContext.setAttribute("bean1", bean1); //set하지 않으면 출력되지않는다.
%>
<jsp:useBean id="bean2" class="com.bit.model.DeptVO" scope="page"></jsp:useBean>
<p>bean1 : ${bean1 }</p>
<p>bean2 : ${bean2 }</p>

배열, 자료구조 호출
String[]
<%
String[] arr1 = {"item1", "item2", "item3", "item4"};
pageContext.setAttribute("arr1", arr1);
%>
<p>String[] ${arr1 }</p>
<ul>
	<li>${arr1[0] }</li>
	<li>${arr1[1] }</li>
	<li>${arr1[2] }</li>
	<li>${arr1[3] }</li>
</ul>

List
<%
List arr2 = new ArrayList();
arr2.add(1111);
arr2.add(2222);
arr2.add(3333);
arr2.add(4444);
pageContext.setAttribute("arr2", arr2);
%>
<p>List ${arr2 }</p>
<ul>
	<li>${arr2[0] }</li>
	<li>${arr2[1] }</li>
	<li>${arr2[2] }</li>
	<li>${arr2[3] }</li>
</ul>

Set - 제어문과 함께 사용해야 출력 제어가 가능하다.
<%
Set set = new HashSet();
set.add(1111);
set.add(2222);
set.add(3333);
set.add(4444);
pageContext.setAttribute("set", set);
%>
<p>Set : ${set }</p>

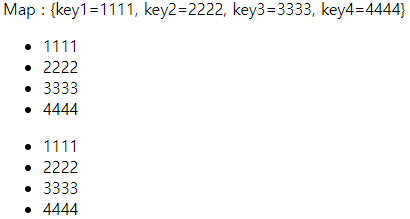
Map
<%
Map map = new HashMap();
map.put("key1",1111);
map.put("key2",2222);
map.put("key3",3333);
map.put("key4",4444);
pageContext.setAttribute("map", map);
%>
<p>Map : ${map }</p>
<ul>
	<li>${map['key1'] }</li>
	<li>${map['key2'] }</li>
	<li>${map['key3'] }</li>
	<li>${map['key4'] }</li>
</ul>
<ul>
	<li>${map.key1 }</li>
	<li>${map.key2 }</li>
	<li>${map.key3 }</li>
	<li>${map.key4 }</li>
</ul>
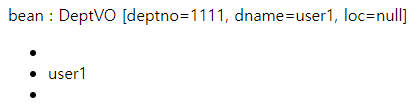
<%
DeptVO bean1 = new DeptVO();
pageContext.setAttribute("bean", bean1);
bean1.setDeptno(1111);
bean1.setDname("user1");
%>
<p>bean : ${bean }</p>
<ul>
	<li>${bean1.deptno }</li>
	<li>${bean.dname }</li>
	<li>${bean.loc }</li>
</ul>
틀리게 쓰더라도 오류가 발생하지 않는다! getter를 자동으로 호출하기 때문에 getter는 필수
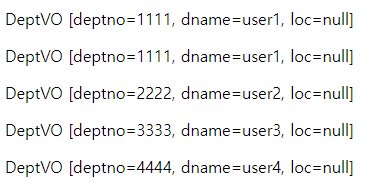
Scope에 따른 변수명 중복 일 경우
page > request > session > application 순으로 출력되며 직접 명세하면 출력 가능
<%
DeptVO bean1 = new DeptVO(1111, "user1", null);
DeptVO bean2 = new DeptVO(2222, "user2", null);
DeptVO bean3 = new DeptVO(3333, "user3", null);
DeptVO bean4 = new DeptVO(4444, "user4", null);
pageContext.setAttribute("bean", bean1);
request.setAttribute("bean", bean2);
session.setAttribute("bean", bean3);
application.setAttribute("bean", bean4);
%>
<p>${bean }</p>
<p>${pageScope.bean }</p>
<p>${requestScope.bean }</p>
<p>${sessionScope.bean }</p>
<p>${applicationScope.bean }</p>
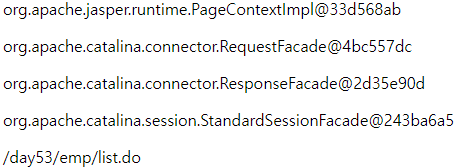
request, response, session 객체 가져오기
<p>${pageContext }</p>
<p>${pageContext.request }</p>
<p>${pageContext.response }</p>
<p>${pageContext.session }</p>

<p>${pageContext.request.contextPath }/emp/list.do</p>
JSTL
주로 EL 과 함께 사용되며 사용전 코드 추가 필수
<%@ taglib prefix="c" uri="http://java.sun.com/jsp/jstl/core" %>
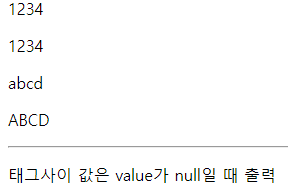
입출력 out, set
<p><c:out value="1234"></c:out></p>
<p><c:out value="${1234 }"></c:out></p>
<c:set var="msg1" value="abcd"></c:set>
<p><c:out value="${msg1 }"></c:out></p>
<c:set var="msg2">ABCD</c:set>
<p><c:out value="${msg2 }"></c:out></p>
<%
pageContext.setAttribute("temp", null);
%>
<c:set var="msg3" value="${temp }"></c:set>
<p><c:out value="${msg3 }">태그사이 값은 value가 null일 때 출력</c:out></p>
조건문
if
else 문이 없다. if문을 여러개 해서든 만들어야 한다.
<jsp:useBean id="bean" class="com.bit.model.DeptVO"></jsp:useBean>
<jsp:setProperty property="deptno" name="bean" value="1"/>
<c:if test="${bean.deptno gt 0 }">
  <p>0보다 크고</p>
  <c:if test="${bean.deptno gt 1 }">
    <p>1보다 크다</p>
  </c:if>
  <c:if test="${bean.deptno le 1 }">
    <p>1보다 작거나 같다</p>
  </c:if>
</c:if>
choose
switch 문과 비슷하나 when마다 break 된다. 사실 상 else if 문같기도 하다.
<c:choose>
  <c:when test="${bean.deptno > 2 }">item1</c:when>
  <c:when test="${bean.deptno > 1 }">item2</c:when>
  <c:when test="${bean.deptno > 0 }">item3</c:when>
  <c:otherwise>몰루</c:otherwise>
</c:choose>
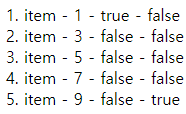
반복문 forEach
<ol>
<c:forEach begin="1" end="10" var="num" step="2" varStatus="status">
	<li>item - ${num } - ${status.first } - ${status.last }</li>
</c:forEach>
</ol>
${status.current} 현재 for문의 해당하는 번호 객체일 경우 value값
${status.index} 0부터의 순서
${status.count} 1부터의 순서
${status.first} 첫 번째인지 여부
${status.last} 마지막인지 여부
${status.begin} for문의 시작 번호
${status.end} for문의 끝 번호
${status.step} for문의 증가값
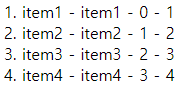
String[] 배열
<%
String[] arr1 = Arrays.asList("item1", "item2","item3","item4").toArray(new String[]{});
pageContext.setAttribute("arr1", arr1);
%>
<ol>
	<c:forEach items="${arr1 }" var="item" varStatus="status">
		<li>${item } - ${status.current } - ${status.index } - ${status.count }</li>
	</c:forEach>
</ol>
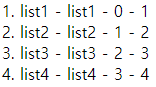
List
<%
List list = Arrays.asList("list1","list2","list3","list4");
pageContext.setAttribute("list", list);
%>
<ol>
	<c:forEach items="${list }" var="item" varStatus="status">
		<li>${item } - ${status.current } - ${status.index } - ${status.count }</li>
	</c:forEach>
</ol>
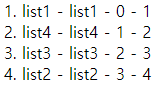
set
<%
Set set = new HashSet(list);
pageContext.setAttribute("set", set);
%>
<ol>
	<c:forEach items="${set }" var="item" varStatus="status">
		<li>${item } - ${status.current } - ${status.index } - ${status.count }</li>
	</c:forEach>
</ol>
map
<%
Map map = new HashMap();
map.put("key1", "val1");
map.put("key2", "val2");
pageContext.setAttribute("map", map);
%>
<ol>
	<c:forEach items="${map }" var="item" varStatus="status">
		<li>${item } - ${item.key } - ${item.value } - ${status.current } - ${status.index } - ${status.count }</li>
	</c:forEach>
</ol>

Object
<%
List<DeptVO> alist = Arrays.asList(
			new DeptVO(1111,"user1","test"),
			new DeptVO(2222,"user2","test"),
			new DeptVO(3333,"user3","test"),
			new DeptVO(4444,"user4","test")
		);
pageContext.setAttribute("alist", alist);
%>
<ol>
	<c:forEach items="${alist }" var="item" varStatus="status">
		<li>${item } - ${status.current } - ${status.index } - ${status.count }</li>
	</c:forEach>
</ol>

etc
forTokens - StringTokenizer
<%
String msg = "item1,item2,item3,item4";
pageContext.setAttribute("items", msg);
%>
<ul>
	<c:forTokens items="${items }" delims="," var="msg" varStatus="status">
		<li>${msg }</li>
	</c:forTokens>
</ul>
<c:url value="bbs/../ex01.jsp" var="link1">
	<c:param name="id" value="${'admin' }"></c:param>
	<c:param name="pw" value="${1234 }"></c:param>
</c:url>
<a href="${link1 }">link1</a>
format
<%@ taglib prefix="fmt" uri="http://java.sun.com/jsp/jstl/fmt" %>
...
<jsp:useBean id="bean" class="com.bit.model.DeptVO"></jsp:useBean>
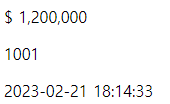
<jsp:setProperty property="deptno" name="bean" value="1200000"/>
<fmt:formatNumber value="${bean.deptno }" var="su" pattern="$ ###,###,###"></fmt:formatNumber>
<fmt:parseNumber value="${'1000' }" var="su2"></fmt:parseNumber>
<p>${su }</p>
<p>${su2 + 1 }</p>
<%
pageContext.setAttribute("nalja", new Date());
%>
<fmt:formatDate value="${nalja }" var="nal" pattern="yyyy-MM-dd HH:mm:ss"/>
<p>${nal }</p>
framework
DispatchSevlet 모듈 만들기
package com.bit.frame.web;
import ...
public class DispatchServlet extends HttpServlet{
// 싱글톤으로 만듦으로써 성능 향상
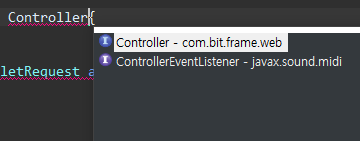
Map<String,Controller> handler = new HashMap<String, Controller>();
@Override
public void init(ServletConfig config) throws ServletException {
Map<String, String> mapping = new HashMap<String, String>();
URL res = config.getServletContext().getClassLoader().getResource("bit.properties");
Properties prop = new Properties();
try {
prop.load(res.openStream());
Set<Entry<Object, Object>> entrys = prop.entrySet();
for(Entry<Object, Object> entry : entrys) {
mapping.put(entry.getKey().toString(), entry.getValue().toString());
}
} catch (IOException e1) {
e1.printStackTrace();
}
Set<Entry<String, String>> entrys = mapping.entrySet();
Iterator<Entry<String, String>> ite = entrys.iterator();
try {
while(ite.hasNext()) {
Entry<String, String> entry = ite.next();
Controller controller = (Controller)Class.forName(entry.getValue()).newInstance();
handler.put(entry.getKey(), controller);
}
} catch (InstantiationException e) {
e.printStackTrace();
} catch (IllegalAccessException e) {
e.printStackTrace();
} catch (ClassNotFoundException e) {
e.printStackTrace();
}
}
@Override
protected void doGet(HttpServletRequest req, HttpServletResponse resp) throws ServletException, IOException {
doDo(req,resp);
}
@Override
protected void doPost(HttpServletRequest req, HttpServletResponse resp) throws ServletException, IOException {
req.setCharacterEncoding("utf-8");
doDo(req,resp);
}
protected void doDo(HttpServletRequest req, HttpServletResponse resp) throws ServletException, IOException {
// handler map
String url = req.getRequestURI();
url = url.substring(req.getContextPath().length());
Controller controller = handler.get(url);
String viewName = controller.execute(req);
// view Resolve
if(viewName.startsWith("redirect:")) {
resp.sendRedirect(viewName.substring("redirect:".length()));
return;
}
String prefix = "/WEB-INF/views/";
String subfix = ".jsp";
req.getRequestDispatcher(prefix+viewName+subfix).forward(req, resp);
}
}
------ Controller interface
package com.bit.frame.web;
import javax.servlet.http.HttpServletRequest;
public interface Controller {
String execute(HttpServletRequest req);
}
------ properties bit.properties
/index.do=com.bit.controller.IndexController
/list.do=com.bit.controller.ListController
/add.do=com.bit.controller.AddControllerweb.xml 로 디스패쳐서블릿 매핑
<?xml version="1.0" encoding="UTF-8"?>
<web-app version="3.0" xmlns="http://java.sun.com/xml/ns/javaee" xmlns:xsi="http://www.w3.org/2001/XMLSchema-instance" xsi:schemaLocation="http://java.sun.com/xml/ns/javaee                       http://java.sun.com/xml/ns/javaee/web-app_3_0.xsd">

  <display-name>Archetype Created Web Application</display-name>
  <welcome-file-list>
  	<welcome-file>index.do</welcome-file>
  	<welcome-file>index.html</welcome-file>
  </welcome-file-list>
  <servlet>
  	<servlet-name>framework</servlet-name>
  	<servlet-class>com.bit.frame.web.DispatchServlet</servlet-class>
  </servlet>
  <servlet-mapping>
  	<servlet-name>framework</servlet-name>
  	<url-pattern>*.do</url-pattern>
  </servlet-mapping>
</web-app>
로컬 배포
만든 프레임워크를 로컬에 배포해서 dependency로 추가해서 사용할 수 있도록 설정
우선 DispatchServlet를 배포하기 위한 빈 web이라는 maven 프로젝트를 만든다. 기본적인 이클립스 설정 필요
mvn archetype:generate -DgroupId=com.bit.framework ^
 -DartifactId=web -DarchetypeArtifactId=maven-archetype-quickstart -DarchetypeVersion=1.4 -DinteractiveMode=false
해당 프로젝트에 DispatchServlet이 있는 패키지를 복사해 넣은 후 아래 커맨드로 패키징 및 로컬 배포
mvn compile
mvn package
mvn install

보여지는 경로로가서 jar 파일이 제대로 생성되어있는지 확인 가능
새로운 프로젝트 생성 후 기본적인 이클립스 설정 한 뒤 dependency 추가
--------- pom.xml
<!-- https://mvnrepository.com/artifact/javax.servlet/javax.servlet-api -->
<dependency>
    <groupId>javax.servlet</groupId>
    <artifactId>javax.servlet-api</artifactId>
    <version>3.1.0</version>
    <scope>provided</scope>
</dependency>

<dependency>
  <groupId>com.bit.framework</groupId>
  <artifactId>web</artifactId>
  <version>1.0-SNAPSHOT</version>
</dependency>
---------- web.xml
<servlet>
  <servlet-name>framework</servlet-name>
  <servlet-class>com.bit.frame.web.DispatchServlet</servlet-class>
</servlet>
<servlet-mapping>
  <servlet-name>framework</servlet-name>
  <url-pattern>*.bit</url-pattern>
</servlet-mapping>
build path에서 잘 들어가 있는지 확인 가능
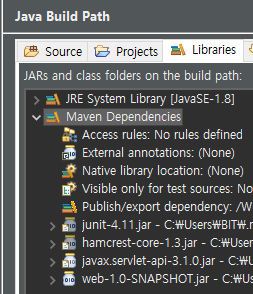
Controller 인터페이스가 잘불러와진다면 ok